


How does the sample get contaminated?
- When a sample valve is closed, a pseudo wall is formed from contamination in the oil to fill the void. This is normal. If the valve is not cycled and flush volume is inadequate, as the sample is collected, contamination is picked up as oil flows through the valve.
- If a sample hose is used, contamination present in the hose is picked up.
- As oil interacts with the air while being transferred to the sample bottle, contamination is picked up.
- Contamination inside the new bottle is collected by the oil.
- Lastly, the one source of contamination most people
forget ...the sample bottle lid. The lid also holds contamination that will be picked up by the oil.
What we can do is dial in our sampling practice enough to eliminate as many variables as possible so that we can use the particle count information
Video Transcript
Hi, my name is Scott Howard with Hy-Pro Filtration and today we will talk about sampling best practices.
We have a sample port here
Upstream gives us information on the entire reservoir, you can then test downstream for filter element performance or to determine if there’s bypass in the housing. But for trend analysis, upstream is preferred.
What we will do here is show how to acquire a proper bottle sample. When we open the valve you want to agitate the valve vigorously several times to get low inside that valve to knock the contaminate that has built up in the valve out of the valve and out of the tubing and into the bucket, prior to pulling a bottle sample.
Again, when you start filling your
We will fill the bottle four times. The first three times, we will fill ¼ to ⅓ full, recap the bottle, agitate vigorously and dump into the bucket. We recap the bottle because the cap itself has contamination.
There are four components that must be flushed to acquire a good bottle sample or a solid contaminant trend analysis: your hose, your valve, bottle, your cap. All four must be flushed. Do not purse the gap in your lips while you’re pulling the sample. Breathing on the cap can add up to 200ppm of water to your lab results.
Here is the process.
Then we will fill the first three times, ¼ to ⅓. Flush the bottle and the cap, continuing to allow the valve and the hose to continue flushing. By the fourth
¼ to ⅓. Agitate vigorously. When you dump the oil back into the bucket, make sure not to splash so there’s no contamination potential.
The fourth time you fill it up to the neck.
At this point in time, then cap for the last time, and then shut off flow.
Now you know you have a good sample because the hose, the valve, the bottle and the cap have been flushed. You have flushed them three
Make sure that when you run the test through the laser counter, the particle count is representative of the entire bottle. Then, you can have good, believable trend data for solid particle contamination. Thank you, this is Hy-Pro Filtration.
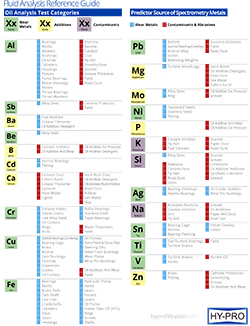
Need help translating your fluid analysis reports into actionable information? Download our Fluid Analysis Reference Guide below!